
![]()
![]()
![]()
![]()
![]()
![]()

![]()


Omega Walls Construction Steps
Step 1.
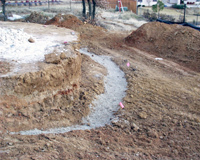
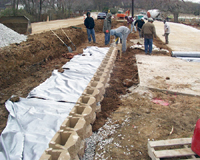
Excavate the Site. The site should be excavated to the proper elevation
of the base course. A small trench approximately 4” deep by 18”
wide should be dug for the actual leveling pad.
 picture 1
Step 2.
Prepare the Foundation Once the base course trench is dug, it should be
filled with either sand or crushed stone and compacted. Care should be
taken to remove all organic material from behind the location of the front
face of the retaining wall.
 picture 2
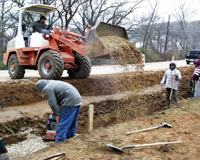
Step 3.
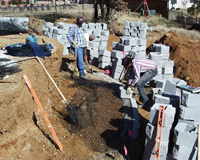
Lay the First Course Once the trench has been leveled the first course
of blocks can be set. Place the units side by side along the desired alignment.
This can be achieved by a string line along either the front or back of
the units. Minor adjustments should be made as needed to insure that each
unit is level both sided to side and front to back. Equally important
is to keep all units at the same elevation so that the base course does
not have high or low spots in it. This will eliminate horizontal gaps
in subsequent courses and make the overall construction faster.
 picture 3
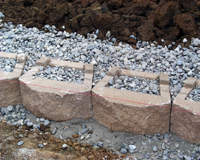
Step 4.
Place Core Fill Crushed rock should be placed inside the cores of each
unit as well as 1’ behind each unit. This aids in relief of hydraulic
pressure as well as increasing the connection strength between the blocks
and the soil reinforcement on structures when it is used. (see picture
3)
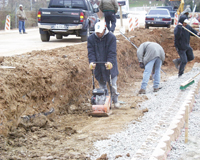
Step 5.
Backfill and compact
behind the units. Once the first course has been set, the backfill material
should be placed and compacted behind the units to the required depth
shown on the plans. This should be done by compacting from the back of
the units out rather than from the back toward the front of the retaining
wall to reduce the pressure on the front of the wall and causing vertical
rotation of the face during construction. On large, tall structures where
heavy compaction equipment is used it should remain a minimum of three
feet away from the blocks and only lightweight compaction equipment should
be used in this area.
 picture 4
Step 6.
Repeat Steps 3, 4, & 5 Once the base course is in place and compacted,
subsequent courses can be placed by repeating steps 3, 4, &5. The
tops of all units should be swept to remove any stones or soil prior to
placing any units or soil reinforcement on top of them. Secure the units
by slightly pushing them forward to engage the locking lips inside the
cavity of the units above them. On tight radius walls, one lip may be
removed by using a hammer with a striking blow parallel to the top of
the unit. Care should be taken to keep from hitting “down” on
the unit as this could cause structural damage to the unit. By removing
one of the lips, the units can be rotated around one point to adjust for
the tighter radius as it gets smaller for each course. When soil reinforcement
is used, be sure to tighten the reinforcement to remove any slack prior
to placing the back fill on top of it.
pictures 5 and 6
Step 7.
Place and secure caps Once the wall is to the final height, the cap units
are placed and can be secured with standard construction adhesive. The
cap units, while looking solid have a cavity similar to the standard units
and engage the lips in the same manner.
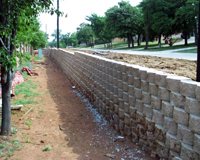 picture 7
Copyright © 2000-, Shaw Technologies International, Inc. All rights reserved.